There are a few options available for adding links on your pages.
This guide covers adding basic links to your page content. For adding links to your navigation areas, please see the
Navigation section.
Note: If your are adding a new document to your site, be sure to
upload the document before linking to it.
Creating a Link
Link Text Tips
- The text for your link should be as descriptive as possible; use words that tell the visitor what they will find when they click the link. Use the name of the document or the title of the page when possible.
- Avoid linking words like "click here" or "learn more". Screen readers have tools to help them quickly find links on each page. Hearing only the words "click here" will not identify what the link is for, resulting in a poor experience for the visitor.
Though not required for accessibility, it is helpful to all visitors to include as much information as you can; such as file type and file size.
Example: Kentucky Counties Map [PDF, 2.1MB]
This helps visitors set expectations; they know they are opening a document, not a webpage, and that the document is a PDF. It also allows them to decide if they want to download a document now, or perhaps at a later time when they have faster internet connection.
Steps
You can create a link similar to how you create a link in Microsoft Word.
- Type out some descriptive link text and highlight it.
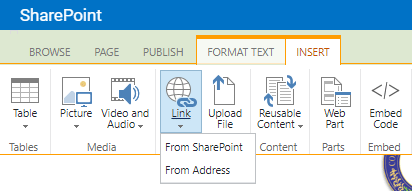
- Click the
Insert tab in the Ribbon, then select
Link.
You will see two options in the dropdown. The option you choose depends on what type of link you are creating.

For links to pages or documents on your site
- Select the
From SharePoint option in the dropdown.
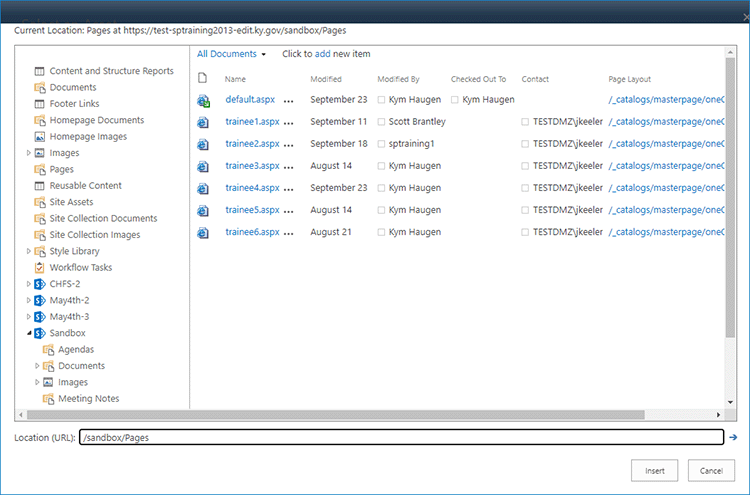
A new window will appear that lists all of the documents and pages in your site.

On the left is a tree view selector that you can use to choose the folder that your document is uploaded to. There are also Pages folders where your pages are stored for each section of your site.
Use the tree view to navigate to the folder where your page or document is uploaded.
- On the right, click the title of the item that you are linking to. The URL of the item will appear in the Location (URL) field at the bottom of the window.
- Click the
Insert button.
Links to external websites or documents
- Select the
From Address option in the dropdown.
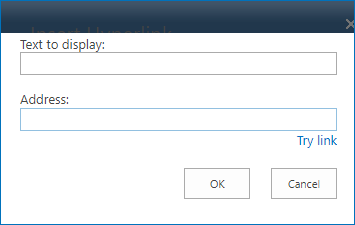
- Copy / paste the link to the webpage or document in the Address box in the popup.

- Click the OK button.
- Your link will appear on the page.
Open in New Tab?
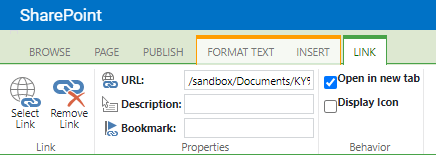
After creating a link, there is a checkbox option to have the link open in a new tab. You can access this option by clicking on the link text, then
clicking the Link tab that appears in the ribbon.

Checking this option will cause the link to open in a separate tab or window, keeping your site open in the existing tab.
Many people choose to open links in new tabs to make it easier for the site visitor to return to their site. In reality, opening links in a new tab often causes confusion for the site visitor.
- It disables the Back button. A visitor who wants to return to your site can’t hit the Back button because there is nothing to “go back” to in this tab.
- The visitor may not realize a new tab was opened. Screen readers do not announce that a link opened in a new tab. If they want to return to your site they will attempt to use the Back button, but as discussed above, it won’t work. This can be frustrating, and they will then have to look through all the tabs to find where your site was.
You should not have any of your links open in a new tab unless you include text specifically stating that it will.
Summary Links
If you are adding a list of links, you may want to consider adding them using a Summary Links web part. This web part makes it easy to add links, reorder them, and move them into categories using headings.
Summary Links web parts also let you add more advanced links, such as links alongside images or icons, with titles, descriptions, button styles, etc. The layouts available will depend on your site’s design.
For details, please see the
Summary Links web part section for setup instructions.
Content Queries
When you have a large list of links on a page, perhaps a group of documents, you may edit your page and see that you can’t directly add to or update those links. In this scenario, you are likely looking at a Content Query web part. Content Query web parts are used to load in sets of documents or links from a folder or list and display them on your page using a preset template.
When you have a large set of documents to link to, this web part is perfect for ensuring all of the links are shown using the exact same layout. You don’t have to create each and every link yourself using this method.
When you encounter a Content Query, you can add and update the links by
- Uploading or deleting a document in the folder that the web part is pulling from
- By making updates to the list the web part is querying
For details, please see the
Content Query web part section.