Alternative Text
When adding images to your site, keep in mind that you will need to add Alternative Text for each image. Alternative Text is a short sentence used by screen readers to convey what the image is portraying.
Screen readers are an accessibility tool used to read the contents of a page to a visitor that has low or perhaps no vision. Your images are just as important to your content as your text is, so you want to make sure the screen reader can convey what your image means.
Writing Alternative Text
- Do not leave the Alternative Text blank!
- Do not use the image file name as the Alternative Text.
- Start the sentence with a capital letter and end with a period.
- Try to be as descriptive as you can, but limit it to about 125 characters.
- If the photo is a portrait of a person, you can use "A portrait of [person's name]." as the Alternative Text. You do not need to describe what the person looks like or what they are wearing.
- It is best to not include text in your images since it is not read by screen readers. If you do include text in an image, that same text must be included in the Alternative Text.
- Remember, Alternative Text is limited to 125 characters so don't include a large about of text in your images.
Adding Images to Page Content
Note: If your are adding a new image to your site, be sure to
resize and upload the image before attempting to add it to a page.
You can add an image anywhere where you can click and type content.
- Click and place your cursor where you want to place the image.
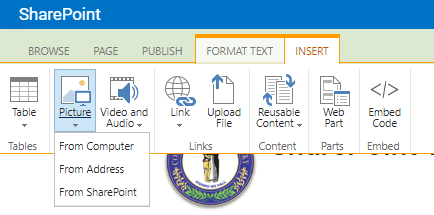
In the Ribbon, click the
Insert tab, then click the
Picture button and choose the
From SharePoint option.
There will also be a two additional options in the dropdown that we won't use.
-
From
Computer: Do not use this action - You can upload the image and add it to the page in one step. The image may not be uploaded where you expect and can be very difficult to locate later. Please use the
upload image steps instead.
-
From Address: Do not use this action - Add an image by pasting in the image URL. Please don't copy image URLs from other sites to use on your site; this is stealing both the image you don't have rights to use and stealing bandwidth.
-
From SharePoint: This is the option you want to choose. It will let you select an image that we uploaded to the site.
- Another window will appear that lists all of the files in your site.
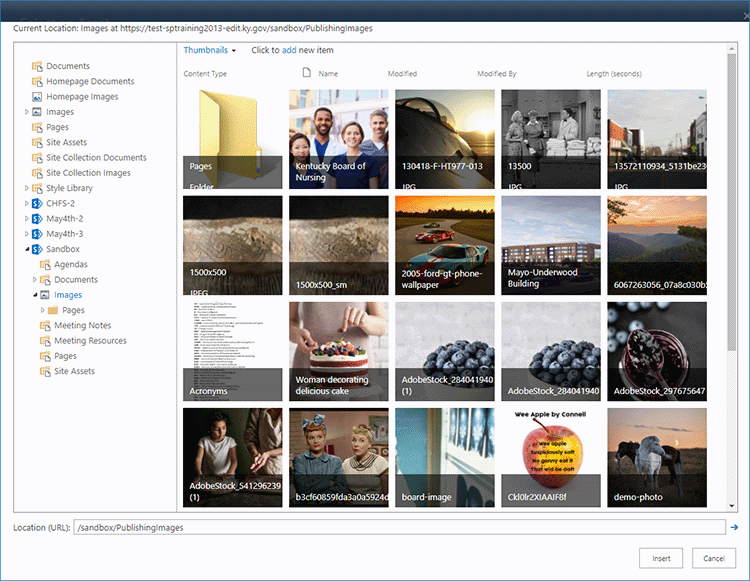
- On the left is a tree view selector that lists the folders on your site. Click the folder where your image was uploaded.
- On the right, click your image you want to add to the page.
- The URL of the item will appear in the Location (URL) field at the bottom of the window.
- Click the
Insert button.
- Your image is added to the page.
- Click somewhere else on the page to remove the grey overlay from the image.
Add the
Alternative Text to your image; click the image, then click the
Image tab that appears in the Ribbon.
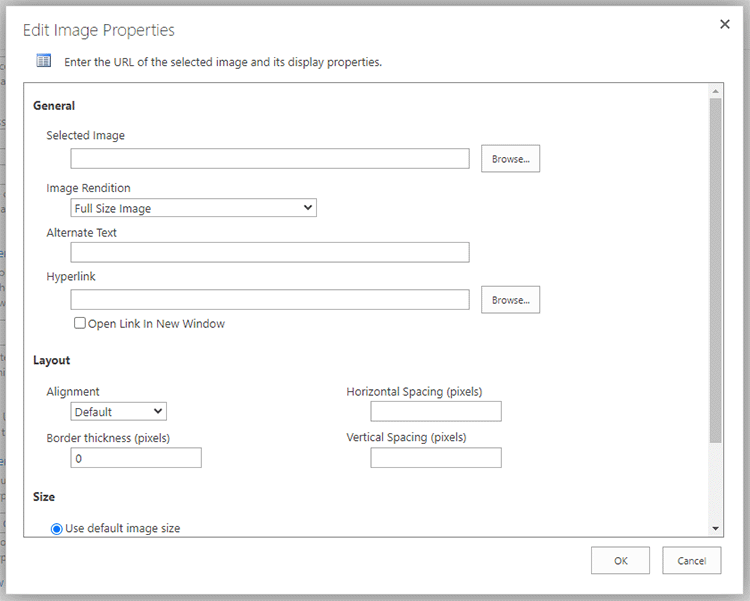
Fill in the
Alt Text field.

Note: In the Image tab you will also see some controls to change the size or spacing of the photo -
Do not use these options. The size controls change the size of the image visually, but will not change the true dimensions of the photo. Photos should always be resized in a photo editor before being uploaded; this keeps the image file size small and helps your pages load quickly.
You can use Adobe Photoshop,
Adobe Express (opens in a new tab), or MS Paint to resize photos.
Image Zones
Your layouts may have built-in image zones where you can add images.
- In the image zone, click the
'Click here to insert a picture from SharePoint' link.

- A new window will appear.
- Next to the
Selected Image field, click the
Browse button.
- Another window will appear that lists all of the files in your site.
- On the left is a tree view selector that lists the folders on your site. Click the folder where your image was uploaded.
- On the right, click the image you want to add to the page.
- The URL of the item will appear in the Location (URL) field at the bottom of the window.
- Click the
Insert button.
- Write a description in the
Alternative Text field.
- Click the
OK button.
- Your image is added to the image zone.
If you need to make any edits to the image, click the image, then click the
Image tab that appears in the Ribbon. You can change the photo or update the alternative text.
Note: In the Image tab you will also see some controls to change the size or spacing of the photo -
Do not use these options. The size controls change the size of the image visually, but will not change the true dimensions of the photo. Photos should always be resized in a photo editor before being uploaded; this keeps the image file size small and helps your pages load quickly.
You can use Adobe Photoshop,
Adobe Express(opens in a new tab), or MS Paint to resize photos.
You can also click the image and hit the
Delete key to remove the image.
Summary Links
If you want to add an image alongside a link, you will want to use a Summary Links web part. The layouts available in this web part will depend on your site’s design.
For details, please see the
Summary Links web part section for setup instructions.