Prepping Images for Upload
Large images can significantly slow down the loading speed of your pages. Before you upload any images you will need to resize them.
You can use Adobe Photoshop,
Adobe Express (opens in a new tab), or MS Paint to resize photos.
The dimensions can be whatever you need as long as the file size is small; less than 75KB if possible. Large banner images can be up to 175kb.
Upload the File
If you'd like to add a new image or document to your site it is important to first start on the page that you want to add that file to.
Generally, your documents and images should be stored in the same area as the page it was or will be added to. This helps to make sure you're able to easily find your documents later.
For example, if you have a meeting agenda that you want to add to your Board Meetings page, you would want to first navigate to that Board Meetings page before you start to upload the new document.
Steps
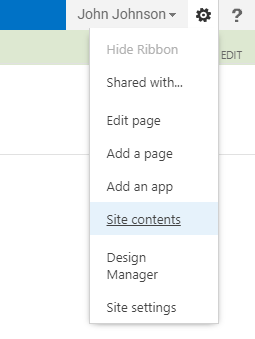
Starting from the page that you want to add the file to, click on the
Site Actions gear in the top right and
choose 'Site contents'.

The Site Contents page is contect-specific, meaning it will show you the folders and files that are uploaded in the area that you were viewing when you clicked the link. If you access Site Contents from another area you may not see the files you were expecting. This is why we recommend first starting on the page that you want to add the file to.
You can review the
Folders article for an in-depth explanation about site structure.
- You will be taken to another page that lists all of this area's folders.
Click the name of the folder that you want to add the documents to. - The new page will list any files currently uploaded to this folder. There are 3 ways you can upload files: using the
New button, the
Upload button, or
Drag and Drop.
Now that the files are uploaded, you can start adding them to your pages.
Linking to pages or documents
Images
File Guidelines
- Each folder on your site has roughly a 5000 item limit, assuming each item is around 2MB. If you go over this limit, the files in the folder will stop working.
- Any
images should be resized in a photo editor
before being uploaded to your site. Keep images a small file size so your pages load quickly. See the
Prepping Images for Upload section above for details.
- Try to upload PDF versions of your documents whenever possible; they are the most widely compatible format. If you need to upload a Word, Excel, or other Microsoft document, try to save it as the 97 - 2003 format. This format will not have the 'x' at the end of the file type; it will be .doc instead of .docx, .xls instead of .xlsx, etc. This older format will allow anyone without the latest Office applications to open the file.
- Do not upload video or audio files for use on your site. Please utilize a service to host these files and then embed them on the page you need. See the
Video and Audio page for details.
Deleting Files
If you no longer need a document, you can delete it from the folder.
Hover over the file and
click the check mark on the left to select the item. With the file selected, go to the
FILES tab in the Ribbon and click the
Delete Document button.

When you click Delete, you will get a prompt asking you to confirm the deletion. Click OK.
The file that you deleted will be sent to a recycle bin where it will remain for a few weeks before being deleted.