If you have a set of related documents or images that you would like to store together you can create a new folder on your site.
Steps
- Navigate to the section of the site where you want to store the files. This will help ensure you create the folder in the proper section.
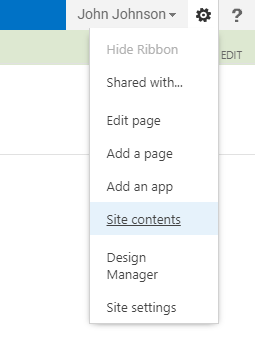
- Click on the
Site Actions gear in the top right and
choose ‘Site contents’.
- Click the
Add an app tile.

- You will see a selection of folder templates. Choose either a
Document Library or a
Picture Library, depending on what type of files you are uploading.
- You will be asked to give the folder a name -
don't do this yet. Instead, click the
Advanced Options link.

On the new page we can set some helpful defaults for the folder.
-
Name: Type in a name for your new folder.
-
Description: If you want you can add a description for your folder.
Document Version History: Set the Versioning option to
No.
Just like we check in / check out pages, we can do the same to files. This isn't usually something that is desired; most of the time you will just want to replace an image or document with the newest version.
Document Template: If creating a document folder, set the document template to
None.
If set to another type of document, the folder will attempt to track more fields and meta data than necessary. When you upload documents to your site, a PDF is the safest choice to ensure that most people won't have any issue viewing your document.
- Click the
Create button.
- You will be taken to your new folder and can start uploading your files.